˂ Return to XTAM Remote App Launcher
New Xton Documentation Center
Xton help has moved. Please visit the current version of this page for the most recent updates. Our new documentation center can be found at help.xtontech.com.
XTAM Privileged Remote Application Launcher using TSplus
This guide is designed for System Administrators to learn about XTAM Remote App Launchers using TSplus and to create a secure, high trust login to MS SQL Server Management Studio . Before you begin this guide, ensure you have the following pre-requisites:
Fully implemented, configured and working TSplus host. You will need access to the host to install our XTAM Auto Shell program and to publish this application.
Updated instance of Xton Access Manager with a System Administrator login.
MS SQL Server Management Studio installed on this TSplus host in the location:
C:\Program Files (x86)\Microsoft SQL Server\140\Tools\Binn\ManagementStudio\Ssms.exe
Valid connection credentials for a MS SQL database connection (Server name, Login and Password)
With the pre-requisites out of the way, this guide will cover the following topics:
- 1. Deploying and publishing the XTAM Auto Shell program
- 2. Configuring the XTAM Remote Apps record types
- 3. Creating your XTAM Remote App Host record
- 4. Creating your XTAM Remote App Launcher record
- 5. Testing your Remote App connection
Step 1: Deploying and publishing the XTAM Auto Shell program on your TSplus Host
Copy the XTAM Auto Shell program from your XTAM host server to your TSplus host. The program is located at
{XTAM_HOME}\pkg\pam-app-launcher.zip
Login to your TSplus host.
On your TSplus host, extract our pam-app-launcher.zip to C:\app. The full program path should be
c:\app\XtAutoShell\XtAutoShell.exe
and an Include directory and PamRemoteApp.jar file will also be in this location.
In the TSplus Admin Tool, navigate to Applications > Application Publishing and add a new application for the XtAutoShell application using the following configuration:
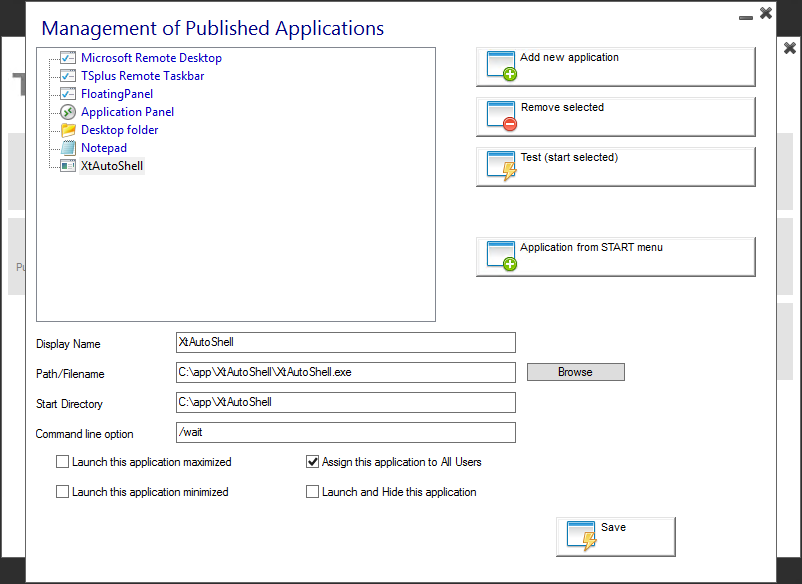
Display Name:  XtAutoShell
Path/Filename:  C:\app\XtAutoShell\XtAutoShell.exe
Start Directory:  C:\app\XtAutoShell
Command Line Option: /wait

Assign this application to All Users:  Enabled/checked
Enable standard Remote Desktop access to this host server and enable permissions for the user account that you intend to define in your XTAM Remote App Host record.
Step 2. Configuring the XTAM Remote Apps record types
Login to XTAM as a System Administrator.
Navigate to Administration > Record Types.
Locate the Record Type Remote App Host and click its Edit button.
Uncheck the option Hidden and then click Save.
Return to the Record Types page and repeat this process for the Record Type MS SQL Studio.
Step 3. Creating your XTAM Remote App Host record
This record will create the secure, remote connection to your TSplus server host.
Navigate to Records > All Records and (optionally) create a new folder.
Create a new Record using the type Remote App Host.
Enter a Name and Description.
Populate the following connection and configuration values:
- Host: Enter the host name for the remote desktop connection to your Windows Remote Desktop Services server.
- Port: Enter the port number for the remote desktop connection to your Windows Remote Desktop Services server.
- User: Enter the user account that will establish the remote desktop connection and launch the published XTAM Auto Shell program.
- Password: Enter the password for this user account.
- Filter: Enter the value MS SQL Studio. This defines which remote applications can be launched with the Remote App Host record. Empty value will permit any applications to be used.
- Remote App Platform: Select TSplus from the dropdown menu.
- Enabled: Check this box to enable this host for connection.
Click Save and Return.
Step 4. Creating your XTAM Remote App Launcher record
This record will be used by the XTAM users to securely launch your MS SQL Server Management Studio remote application.
Create a new Record using the type MS SQL Studio.
Enter a Name and Description.
Populate the following connection and configuration values:
- Host: Enter the server name for your MS SQL Database connection.
- User: Enter the user account for your MS SQL Database connection.
- Password: Enter the password for this user account.
Click Save and Return.
Step 5. Testing your Remote App connection
Open the MS SQL Studio record that was created in the previous step.
Select the Connect and Record option to establish the connection with session recording enabled.
A new session will open. It will first establish a secure connection to your Remote App Host server and then it will launch the XTAM Auto Shell script. Now, the XTAM Auto Shell program will launch MS SQL Server Management Studio, populate the Server name, User and Password parameters automatically and open the database connection. Once the connection is made, keyboard and mouse controls will be returned to you.
Navigate through your MS SQL database and execute a few test SQL commands. Once satisfied, you may exit MS SQL Server Management Studio and then disconnect the secure remote session by closing this browser tab or window.
At this point, you may review the video and keystroke recordings by opening the Sessions tab for this record.
This completes the XTAM Remote App Launcher using TSplus walkthrough. For additional remote app topics and how-to guides, return to the Remote App Launcher main page and use the topics listed at the bottom to navigate the available articles.
˂ Return to XTAM Remote App Launcher